Tips and Tricks
On this page we share various tips and tricks for the Sprinter van. Check back often for more.
Leveling the Sprinter using the free Truma app
The Truma Android app has a leveling feature within the Tools section. You can easily download this app at no cost from the Google Play store:
The long and extended Sprinter versions all have the same rear wheel track width and wheel axis distances.
- Wheel Track Width Front Axle is 1685mm
- Wheel Track Width Rear Axle is 1517mm
- Wheel Axis Distance is 4325mm
In the Truma app, click on TOOLS, click on LEVELING, click on MOTORHOME, then click “OK” when instructed to lay down the mobile device.
The very first time you use the app, click on the CALIBRATE button to calibrate the phone sensors. Click CONTINUE.
At the top of the leveling screen, click on DISTANCES. There are two fields that need to have values in them. You only need to enter this once for your Sprinter.
In the first field labeled “1. Axis distance (cm)”, enter 432. This value is 432cm and is almost equal to 4325mm.
In the second field labeled “2. Track width (cm)”, enter 151. This value is 151cm and is almost equal to 1517mm and this is the REAR track width. Do not enter the FRONT track width.
When finished, click ACCEPT INPUT.
On the Leveling screen you will see the Sprinter from the top view, divided into quadrants - front-left, front-right, rear-left, rear-right. The values in each quadrant are the number of centimeters that the particular wheel needs to be raised in order to level the Sprinter.
Due to slight inaccuracies in cellphone sensors, the values in each quadrant might change by very small values but they should all be near zero centimeters.
You’ll need some wood or plastic levelers with you which you can either make or purchase.
If you have various 2x6 pieces of wood planks with you, the thickness of each plank is 1.5 inches or roughly 4cm thick. For multiple pieces you will have to stagger them so that it creates a ramp for you to drive onto.
Click on the START button. The beach ball shown on the screen will roll to the lowest point in the van. If it rolls into the middle, the screen will turn green. Otherwise the screen will remain light grey and provide audible beeps.
The instructions on screen show “Drive onto ramps placed in front of the deviating tires.”
Once you have done so the screen will turn green. Click the CONTINUE button, then the DONE button. The app will remind you to apply the emergency brake so that the van does not roll back or forward.
That’s an easy way to level your Sprinter van so it’s relatively comfortable to sleep at night.
This app and process will work with any motorhome. You will need to gather the wheel axis and rear wheel track widths for your particular motorhome.
Sprinter Central Locking Feature - Disable or Enable
From the Owners Manual: Place the key in position 2 in the ignition lock and close all doors. To switch off automatic locking of the front-seat passenger door and the rear-seat passenger area/cargo area: Press the central locking switch at the bottom and hold it there for about 5 seconds. The right indicator lamp flashes twice. Automatic locking when the engine is started is switched off. To switch on automatic locking of the front-seat passenger door and the rear-seat passenger area/cargo area: Press the central locking switch at the bottom and hold it there for about 5 seconds. The right indicator lamp flashes four times. Automatic locking when the engine is started is switched on (standard setting). NOTE: A door which is closed after the engine has been started will not be locked automatically.
Safety Systems - Fire Extinguisher Seat Mounting
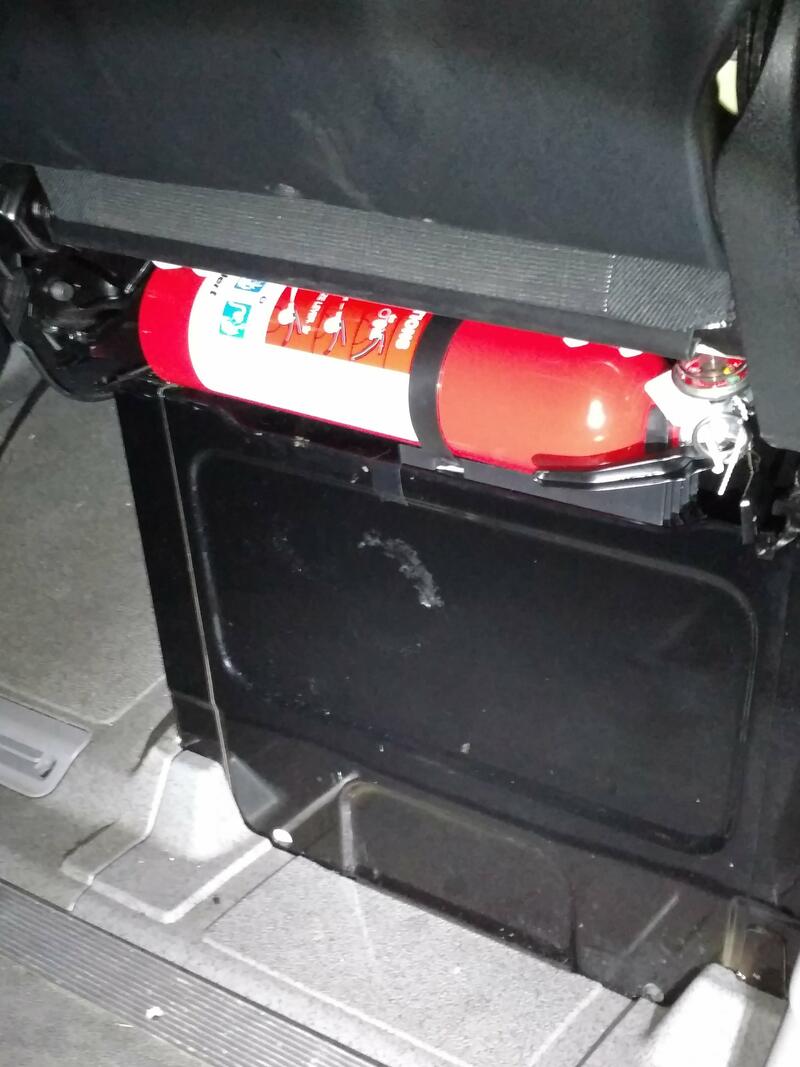
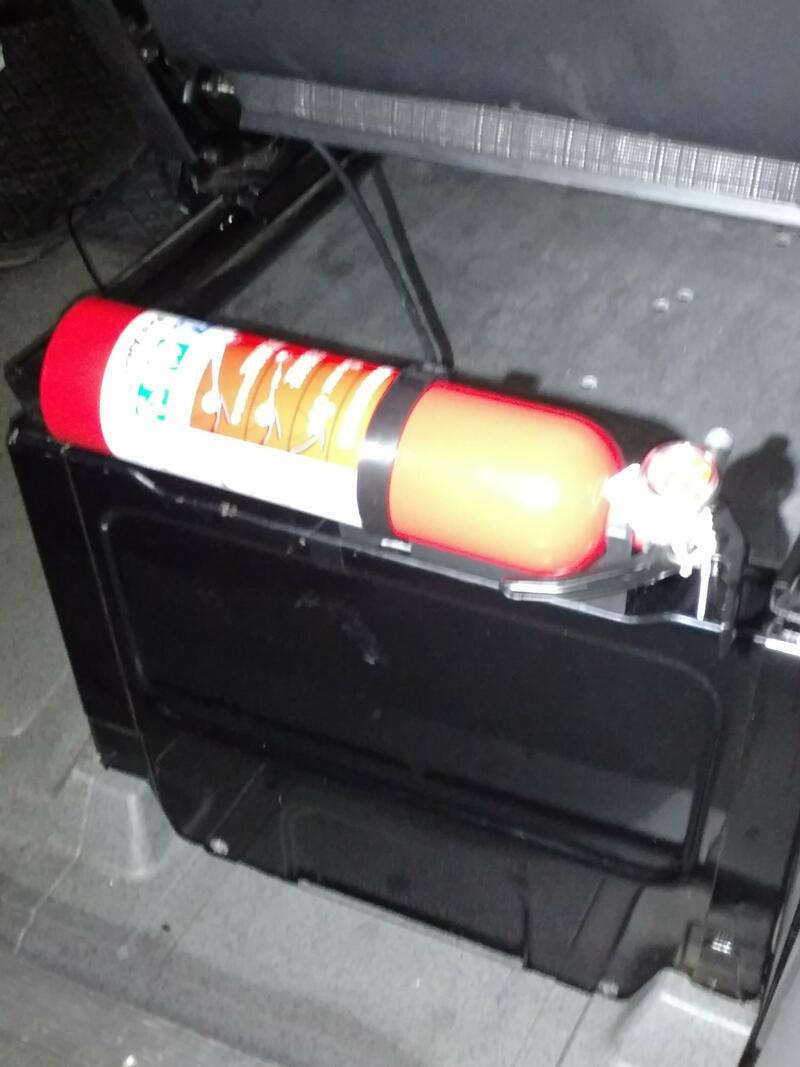
A First Alert Fire Extinguisher Home1 fits perfectly on the back of the passenger seat pedestal. This unit was purchased at the local Costco on 05Jan2018. Even with the seat extended as far back as possible, it will not touch the extinguisher. Three self-tapping metal screws secure the extinguisher holder to the seat pedestal.


(Any purchase you make on Amazon, we get a small commission - links work for Amazon Canada, USA, UK, France, Germany, Europe)
We later upgraded to a higher capacity model of Amerex ABC Multi-Purpose Fire Extinguisher, 5 lb.
Safety Systems - Carbon Monoxide Detector
(Any purchase you make on Amazon, we get a small commission - links work for Amazon Canada, USA, UK, France, Germany, Europe)
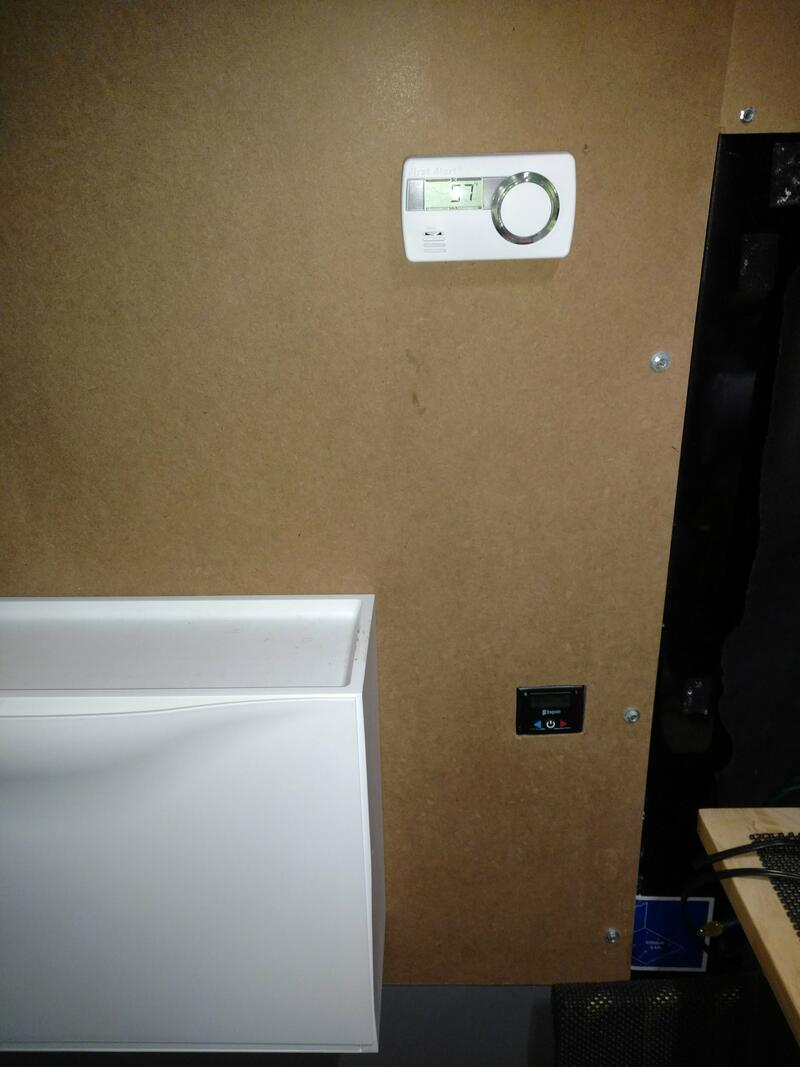
A First Alert CO710 10-Year Carbon Monoxide Alarm with Temperature & Digital Display was purchased on 05Jan2018 at Costco and installed about 5 feet from the floor above the Espar heater near the sleeping area. This device is battery powered, and good for 10 years without any battery replacement required. The Amazon affiliate link will send you to the Amazon Canada website in case you don’t have a local Costco close by.
Mounted on the wall, it also provides a digital temperature readout. It should provide some extra level of assurance that the vehicle is free of any dangerous gasses while sleeping.

Use this seatbelt tip to stay safe inside your Sprinter at night
Take the driver and passenger side seat belts, and loop each through the inside door handle as shown in this short video:
Iwatani 35FW No ignition / No Flame Fix
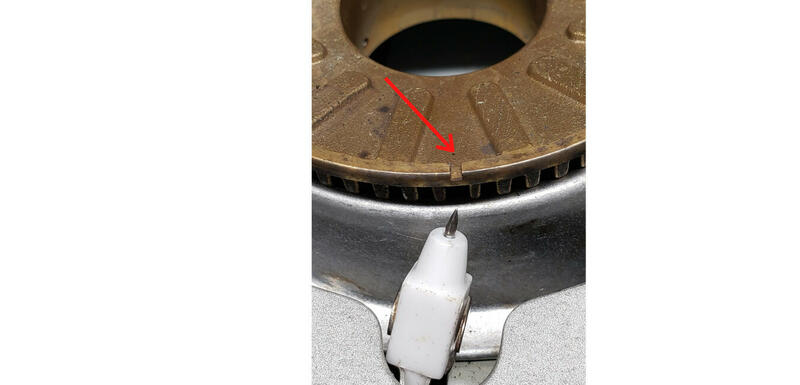
Do you have an Iwatani 35FW butane stove burner that is refusing to light? Does your Iwatani not ignite? We have a simple and easy fix for you! On the brass burner portion of the stove, there is a tiny notch that you need to line up with the white igniter. See the photo below:

See the video for more detail on how to fix it!
Iwatani 35FW Butane Stove Burner Review
We also have an Iwatani 35FW Butane Stove Burner Review for you here. It is the one we have installed in our Sprinter and bring it literally everywhere we go! Perfect for #vanlife!
Long Range Wifi Access with Ubiquiti Network Equipment
Have you ever wanted to access wifi from your car, van, camper, trailer, RV or even in your boat when docked at the marina? Have you ever been in your van trying to do some computer work trying to access the free wifi provided by Starbucks or McDonalds and you’ve been out of range? With the pandemic, many restaraunts are closed, and the ones that are open just don’t have any seating available inside.
Using high-quality networking equipment from Ubiquiti, a very well known and established brand used in Enterprise and the home consumer market, we use two of their products - the AirCube wifi router and the NanoStation M2 router and antenna to act like a wifi extender.
We’ve been using this solution since early 2019, and we’ve gained a lot of experience which we share with you.
This is the equipment you will need to purchase:
ONE UBIQUITI NANOSTATION M2
Ubiquiti NanoStation M2 (View on Amazon USA)
Ubiquiti NanoStation M2 (View on Amazon CA)
Ubiquiti NanoStation M2 (View on Amazon FR)
Ubiquiti NanoStation M2 (View on Amazon UK)
ONE UBIQUITI AIRCUBE ISP
Ubiquiti AirCube ISP (View on Amazon CA)
Ubiquiti AirCube ISP (View on Amazon UK)
Ubiquiti AirCube ISP (View on Amazon DE)
TWO ETHERNET CABLES - YOU NEED TWO OF THESE AND CHOOSE THE LENGTH YOU NEED
Monoprice Shielded CAT6 POE (View on Amazon USA)
Monoprice Shielded CAT6 POE (View on Amazon CA)
OPTIONAL WINDOW NANOSTATION MOUNT
Ubiquiti Nanostation Window Mount (View on Amazon USA)
Ubiquiti Nanostation Window Mount (View on Amazon CA)
Ubiquiti Nanostation Window Mount (View on Amazon UK)
Ubiquiti Nanostation Window Mount (View on Amazon FR)
Alternatively you can also purchase the UBIQUITI AIRCUBE ACB-AC but you will need to configure it yourself since we don’t have a version of this to test and setup here.
Ubiquiti AirCube ISP (View on Amazon USA)
AirCube and Nanostation Config Files for download
We have created two configuration files for you to download from our website. One is for the AirCube ISP and the other is for the NanoStation M2
You can download them from the following links. Preferably download them to your Android or Apple iOS device.
airCube-ISP-SprinterDiscovery.cfg
XW-NanoStationM2-SprinterDiscovery.cfg
Download Ubiquiti UISP app from the Google Play or Apple Store
Go into Google Play or your Apple Store, download and install the latest version of UISP.
Ubiquiti UISP Apple Store iPad/iPhone
AirCube and Nanostation Config File Details
Information current as of May 2021.
AirCube-ISP
| SSID: | VanlifeWiFi |
| SSID Network Password: | WifiPassword |
| admin id: | ubnt |
| admin password: | Password01 |
| IP: | 192.168.3.1 |
Nanostation M2
| SSID: | DEFAULT (Change this SSID to the access point you want to connect to ie: Starbucks, McDonalds, etc) |
| Lock to AP: | (Blank) (optional but should be set to the SSID access point Mac Address that you want to connect to) |
| WPA-AES Preshared Key: | 12345678 (change this to the network password if it is encrypted) |
| Admin username: | ubnt |
| New Password: | Password01 |
| IP: | 192.168.2.1 |
SETUP NANOSTATION - Connect to home wifi router for easy setup
- Plug in PoE Injector into the wall outlet (110V)
- Plug in a high-quality Shielded CAT6 Ethernet into the PoE Injector into the PoE Port
- Plug in the other end of the Ethernet cable into the MAIN port of the Nanostation M2. This provides power to your Nanostation
- Plug in a second high-quality Shielded CAT6 Ethernet on the PoE Injector into the LAN port
- Plug the other end of the Ethernet cable into your home wifi router LAN port. Your network should be on the 192.168.1.x subnet
- Using your Android phone, run the UISP app. Wait until the Nanostation Power light is solid green and the LAN1 light is blinking
- On your Android phone, connect to your home wifi network
- On the Devices screen, you will see your Nanostation connected to your home wifi, marked with a “Needs Setup” label on the right
- Click on the NanoStation M2 icon
- On the screen where it shows “Connect to…”, at the bottom of the screen click on “Manual Setup”
- After a few seconds there will be a final screen with a large check mark and a note stating that Device activation successful. NanoStation M2 is now active”
- Click on the FINISH button on the bottom of the screen.
- At this point, take note of the IP address details. In this example, the IP address it was assigned is 192.168.1.56
- On your Android phone, go into your browser and enter 192.168.1.56 Click Advanced, Click Accept the Risk
- The NanoStation signin page is now displayed on your screen.
- For the username enter: ubnt
- For the password enter: ubnt
- Click Login
- Click on the System Tab, Click on the Browse button in the Configuration Management section located near the bottom right of your screen
- Select the file you downloaded previously call XW-NanoStationM2-SprinterDiscovery.cfg
- Click on the Upload button next to the file shown in the NanoStation Configuration Management section.
- At the top right of the screen click on the Apply button.
- Wait one minute for the configuration to be applied
- It is now safe to disconnect the cables
- Now follow the directions for connecting the NanoStation to the AirCube
Download the AirCube Firmware Image. You need an Internet connection for this (mobile data or wifi)
- On your phone, run the UISP app
- There are three tabs at the bottom of the screen. Select the TOOLS tab at the bottom right.
- In the TOOLS screen, select Firmware
- Scroll down until you see AirCube. You will see 2.8.0(ACB). Click the download button on the right.
- This will download the firmware for your AirCube
Download the NanoStation M2 Firmware Image. You need an Internet connection for this (mobile data or wifi)
- On your phone, run the UISP app
- There are three tabs at the bottom of the screen. Select the TOOLS tab at the bottom right.
- In the TOOLS screen, select Firmware
- Scroll down until you see AirMax M. You will see 6.3.2 (XW). Click the download button on the right.
- This will download the firmware for your NanoStation
Steps to configure a brand new AirCube-ISP and Nanostation M2
- Plug in PoE Injector into the wall outlet (110V)
- Plug in a high-quality Shielded CAT6 Ethernet into the PoE Injector into the PoE Port
- Plug in the other end of the Ethernet cable into the AirCube PoE Input port (Grey in colour)
- Wait until the light on the bottom of the AirCube is solid white.
- On your Android phone, select wifi with the name beginning with “AirCube”
- For the password, enter the string of letters and numbers found on the bottom of the AirCube next to the tag WPA2. In this example we will use the password 7hJVgfuickA
- Since we are not yet connected to any Internet, select “Keep Wi-Fi connection”
- If using your phone, turn off Mobile Data
- In any browser type: 192.168.1.1
- When it says “Secure Connection Failed” click on “Advanced”. When it says “Someone could be trying…” click on “Accept the Risk and Continue”
- Scroll down to the bottom of the page. For username enter: ubnt For password enter: YDDzkJkC
- Then press Login
- Select your Country. In this example setup we will use our home country of CANADA.
- Click on the checkbox where it asks to agree to the terms of use.
- Click on Continue
- The main AirCube screen will be displayed, it will then show a Network error, drop the network and within a few seconds will reconnect to the AirCube network. Press Continue one final time to get to the main AirCube screen.
- Click on the Gear icon (Large Gear with a small gear), then scroll to the bottom of the page.
- Select Upload configuration
- Make sure the file “airCube-ISP-SprinterDiscover.cfg” is available on your local device (phone or tablet or computer).
- Select the file: airCube-ISP-SprinterDiscover.cfg
- On the Configuration Load dialog box, select APPLY CONFIG CHANGES
- After the upload has been successful, the wifi will be disconnected since the wifi name is different
- Go to the wifi settings on your device (phone or tablet or laptop)
- Select the new wifi name VanlifeWiFi
- When prompted to enter the password, enter: WifiPassword
- Select Connect
- Select Keep Wi-Fi Connection. You’ll then be connected without Internet.
- Unplug the Ethernet cable from the AirCube, and wait 5 seconds
- Plug in the Ethernet cable once again, and wait until the light at the bottom of the AirCube is a solid white.
- Go into your Wifi settings on your device (phone or tablet or laptop) and make sure you are connected to the VanlifeWiFi network
- To access the AirCube, you enter the new IP Address of 192.168.3.1
- Click on Advanced…
- Click on Accept the Risk and Continue
- At the Login page, enter the username of: ubnt
- For password enter: Password01
At this point, the AirCube is configured properly
Time to connect the NanoStation M2 to the AirCube and test accessing the Internet On your Android phone connect to the AirCube’s VanlifeWifi access point.
- Connect the other Ethernet cable to the AirCube’s blue-coloured WAN port, and the other end of the Ethernet cable to the Nanostation M2 Main port on the right. Allow a minute to start up.
- On your Android phone, start up your browser and enter 192.168.2.1 for the address. Make sure your mobile data is off.
- Click Advanced, click Accept the risk…
- For the user name enter: ubnt
- For the Password enter: Password01
-
Click on Login
- Click on the WIRELESS tab
- Next to the SSID field, click the SELECT button. This will search for all local wifi names.
- You can sort by Encryption or Signal. When vanlifing, sort by Encryption and find those networks that have NONE.
- On the left column, you will see a radio button that you can select to chose the network you want to connect to. You will see in that list the “VanlifeWiFi” name - that’s your AirCube. Don’t select that one.
- Once you have selected a wifi name to connect to, scroll to the bottom of the page and click LOCK TO AP (That means Lock to Access Point)
- You will automatically return to the WIRELESS tab, and now scroll to the bottom right and click CHANGE
- The page will refresh. If you chose an access point that has a known password, enter that password in the WPA Preshared Key field. Click CHANGE if you did enter a password.
- At the top right of the screen, click the APPLY button.
- Now click on the MAIN tab
- Here you will see all the connection start to happen. The CPU value will go from a low to a very high value for a short time and then return back to a lower value. This typically means that the Nanostation has found the wifi and is trying to connect
- If everything is okay, you will see a value in the “AP MAC” field, a Signal Strength indicator, a TX/RX Rate pair with values.
- You should now have Internet access. Test it by going to any website. Make sure your mobile data is still off.
In the video (coming soon!), we provide a bunch of tips and tricks to connect to various wifi points. There will be times when you can’t get Internet and it could be that the provider (Starbucks or McDonalds or somebody else) is having network troubles are are overloaded with customers. Like anything in life, nothing is guaranteed.
We advise that the administrator password and wifi password be changed to something other than the defaults. Please make sure yoyu write down the passwords so you can reference them later. If you forget, you will need to reset your equipment and re-configure.
CHANGE ADMINISTRATOR PASSWORD
- Click on the Gear icon in the UISP app
- Click on CHANGE PASSWORD
- Enter a new password in the first input box, and again on the second input box
- Click CHANGE
CHANGE WIFI NAME AND PASSWORD
- Click on the Wifi icon in the UISP app
- To rename the SSID, change the VanlifeWifi to something else
- To change the wifi password, change it to something else
- At the bottom of the screen, click SAVE CHANGES
- You will have to reconnet to the new wifi name and enter the new password if you chose one